A Step-by-Step Guide: Sculpin on Netlify

Today we’ll take a look at how to install and setup a basic Sculpin blog site with assets on GitHub, in continuous deployment on Netlify.
Sculpin is a fast static site generator, which uses Twig templates, built on Symfony’s HTTP Kernel and written in PHP. It’s arguably the most mature and well documented static site generator written in PHP.
For those unaware, PHP is a serverside language based on C and has long been used to make dynamic homepages. This isn’t as common as static site generators written in Javascript or Ruby and it will be interesting to see how it works compared with these.
If you feel at home with PHP, Sculpin will be right up your alley. It comes with lots of built-in features, including embedded Composer. Composer is to PHP what npm is to node.js or bundler is to Ruby–it will install and handle dependencies for the project, so it’s handy that it comes built in.
Please note that this guide assumes you have git installed, as well as a recent PHP version 5 or up with command line interface and cURL libraries
As an example, if you need install PHP5 with the command line interface and the cURL libraries on Ubuntu Linux, you would use the following commands from a terminal window:
sudo apt-get update
sudo apt-get install php5 libapache2-mod-php5       # Main thing - PHP5
sudo apt-get install php5-cli                       # command line addition
sudo apt-get install php5-curl                      # cURL libraries
Quick Start Guide
Now let’s quickly get you up and running with a template Sculpin site you can play around with.
If you aren’t familiar with the commands used and would like a more detailed introduction and guide, simply scroll down to here.
The commands will help you download and install Sculpin with a blog skeleton, simply substitute my-sculpin-site with the name of your choice.
curl -O https://download.sculpin.io/sculpin.phar
chmod +x sculpin.phar
sudo mv sculpin.phar '/usr/local/bin/sculpin'
git clone https://github.com/sculpin/sculpin-blog-skeleton.git my-sculpin-site
cd my-sculpin-site
sculpin install
sculpin generate --watch --server
The first three lines will download Sculpin, set its permissions to be able to execute it and move and rename it to a location that is in the path. Please note that this path may in some cases differ on your system!
To see which locations are in the path, use this command in a terminal window: echo "$PATH"
Setup Sculpin
The quick guide is not to everyone’s taste, so we’ll delve deeper into the installation and setup of Sculpin in this step-by-step guide.
1. Download, Permissions and PATH
Let’s get this slippery sculpin, set its permissions and add it to the path.
Open a terminal window and use the following three commands:
curl -O https://download.sculpin.io/sculpin.phar
This command downloads sculpin using curl.
chmod +x sculpin.phar
This makes the file you just downloaded executable.
sudo mv sculpin.phar '/usr/local/bin/sculpin'
And this adds it to your PATH, so that you can execute it from anywhere.
Consider keeping your terminal window open in between steps, for your own convenience!
2. Clone Skeleton
Sculpin can be customized to run just about any kind of site you’d want to, but unless you want to specify all of this by yourself, it helps to clone a sculpin skeleton structure for your type of site.
First, clone the blog skeleton
git clone https://github.com/sculpin/sculpin-blog-skeleton.git my-sculpin-site
Then change to the directory you just cloned:
cd my-sculpin-site
3. Install Dependencies
Before we can view our Sculpin site, it will need to install various dependencies, using composer.
Since composer is built into sculpin, simply run this command from terminal in the root of your site:
sculpin install
As we downloaded the skeleton, we’ve already got the essentials needed to view the site!
4. Run Sculpin Server
Let’s take a look at our first catch of the day by running this sculpin command in a terminal window:
sculpin generate --watch --server
The generate command will build our site and when using the --watch flag, Sculpin will watch over the files in your site like a hawk and whenever anything’s changed, it will re-generate the site automatically and instantly. The --server flag will launch a PHP web server, so you can see your work in progress at localhost:8000.
Check to see if everything is running like it should, before we start adding our own content.
5. Create Content
Let’s create our first piece of content, a markdown file following Jekyll’s file name format YYYY-MM-DD-Title.md with a date that’s newer than today, so we can make sure it pops up on top, like it would in an ordinary blog.
We created the 2016-03-02-Sculpin-on-netlify.md file in the /source/_posts folder with the following content:
---
title: Sculpin on Netlify with GitHub
tags:
    - Sculpin
    - blog
    - netlify
categories:
    - time
---
# Sculpin on Netlify
This page is mainly created to demonstrate a basic Sculpin Blog site, with assets hosted on GitHub using Netlify to deploy in continuous deployment.

Sculpin uses Markdown and twig and twig knows this page's name is: A Step-by-Step Guide: Sculpin on Netlify

We'll run some font and layout tests...

**This font is Bold.**

*This font is Italic.*

***This font is Bold and Italic.***

## Headline Title Two

### Headline Title Three

#### Headline Title Four
I wonder if the titles above will render in the proper size and font for headline 2, 3 and 4.
Let’s take a look at our work.
Assuming the server hasn’t crashed yet (it probably will), simply refresh your browser at localhost:8000 and behold.
When working with Sculpin it’s worth noting two things about running the server. The first is that it might crash, but the solution to this is simple, as all you have to do is re-run the generate command again like before: sculpin generate --watch --server
Another tiny issue is when the content hasn’t generated completely, for whatever reason. When this happens, simply stop and then restart the server, by first pressing control + c to stop (while you have your terminal window with the server running selected) and then re-running the generate command again like this: sculpin generate --watch --server
6. Generate a Production-Ready Site
Once you’re happy with the result of your output, it’s time to make a production ready version of the site and go live with it. The way Sculpin works, is is possible to have a production setup that is different from a development and a live setup and to do this, an output folder for each is created.
With our small demonstration site, it hardly seems necessary to have two output folders, but in the long run it will make more sense.
To create a production ready version of our site, we need to use the following command from the root of our site:
sculpin generate --env=prod
With this command, Sculpin will create a standalone output_prod directory for upload to a live environment.
Pushing Sculpin to GitHub
We want to set up an online GitHub repository with our local environment and push our local files to this repository. Next, we’ll connect Netlify to the repository for our automatic build (i.e. whenever you push to GitHub, Netlify will rebuild your site).
1. Create your Git Repo
We start by creating a GitHub repository for our Sculpin site and generator.
We’re naming ours sculpin-demo and we’ll skip adding files to the repository until after its creation, as this can sometimes create problems (The README, license and gitignore files).
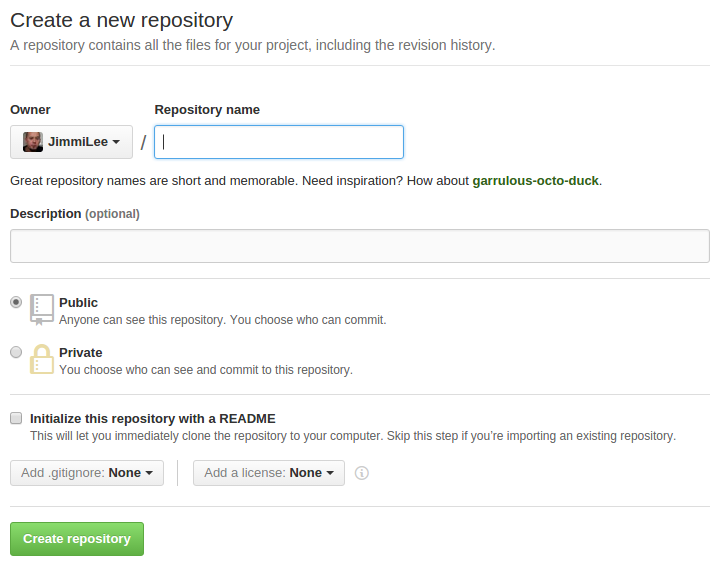
Once the repository has been named and created we’ll return to local environment.
2. Update Repo URL
Since we downloaded the skeleton, our site is already set up as a git repo, but it’s pointing to the blog skeleton and not our own repo!
To see which repository your local directory points to use the git remote -v command in a terminal window and to change this to our own repo, we use the following command in a terminal window:
cd my-sculpin-site
git remote set-url origin my-repository-url
Instead of my-repository-url insert the URL of the repo you’ve just created for this purpose - it will look something like this: https://github.com/username/repository-name.git
3. Add & Commit
We need to add all the files and subdirectories to the repository with the git add . command and stage them for the first commit with the git commit -m 'First commit' command.
In quick succession in a terminal window:
git add .
git commit -m 'First commit'
No need to worry about a .gitignore, since this was included in the skeleton we downloaded and has already been set to not include any output folders.
4. Push to GitHub.
The final task before we’re done setting up is to push your files to GitHub:
git push -u origin master
All your files will be copied to your online repository. Once it’s done, take a look at the repository online to check if everything looks correct.
It’s time to connect it with Netlify.
Connect with Netlify
Creating a new site on Netlify is intuitive and once you’ve created an account and logged in, you’ll be taken to https://app.netlify.com/sites.
Step 1: Add Your New Site

Click the “New Site” button (as seen above) to get started.
Step 2: Link to Your GitHub
Clicking “New Site” brings you to this screen:
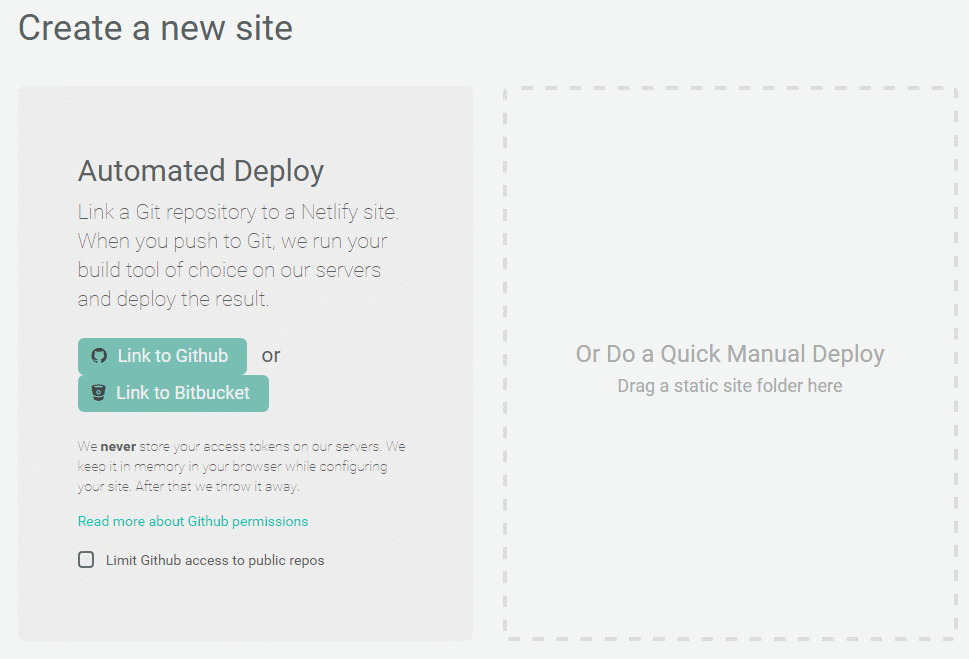 When you push to GitHub, Netlify does all the work. No more wasting time on manual deploying of updates or changes!
Since we’re hosting the site assets on GitHub, we’ll need to link Netlify with GitHub. Click the button “Link to GitHub”.
Step 3: Authorize Netlify
If you already have an account with Netlify (awesome!) you can skip down to Step 4. If you are new to Netlify, read on.
You will be asked to provide your GitHub login details:
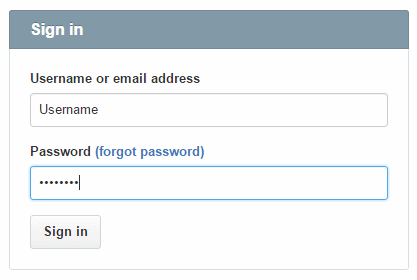
We need to let Netlify and GitHub talk to each other, so review the permissions and then click authorize application.
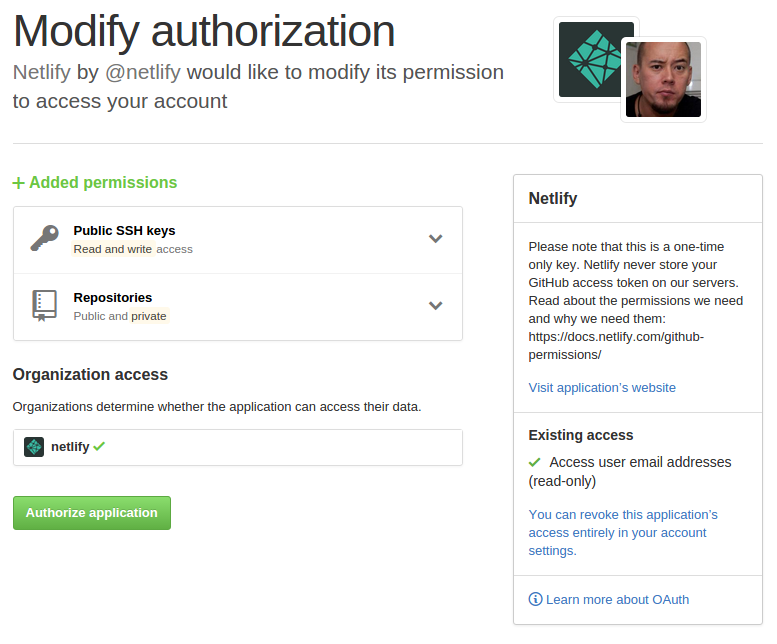
Like it says in the image above on the right, Netlify doesn’t store your GitHub access token on our servers!
If you’d like to know more about the permissions Netlify requests and why we need them, you can check out our documentation on GitHub Permissions.
Step 4: Choose Your Repo
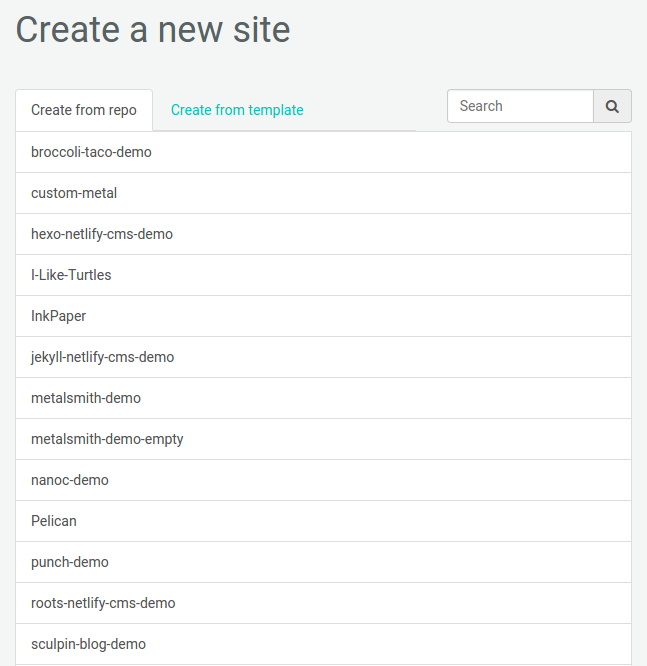
Once you’re connected to GitHub, Netlify will show you a list of your GitHub repositories, as seen above. For the purpose of this tutorial we’ll select the “sculpin-blog-demo” repo we just pushed to GitHub.
Step 5: Configure Your Settings
Fill in the configuration settings as seen in the screen shot below:
Click the ‘Save’ button and watch the magic unfold.
Step 6: Build Your Site
Step 7: The End
That’s it.
Once Netlify has build your site, it will assign a random name to it and you’ll be presented with the site and the control panel for the site, ready for additional cusomizing.
You can change the site to be private and password protected, which is great for work in progress. You can also assign a custom domain name and it’s easy to change settings for your site in general and gives you a good quick overview.
You can see our demo site here and the GitHub project for the demo site here.